
Purpose
As a Part Creator, you can create Multilevel BOMs, or indented BOMs to represent how you build a Finished Product including all the Subassemblies, Components, and Materials that go into it.
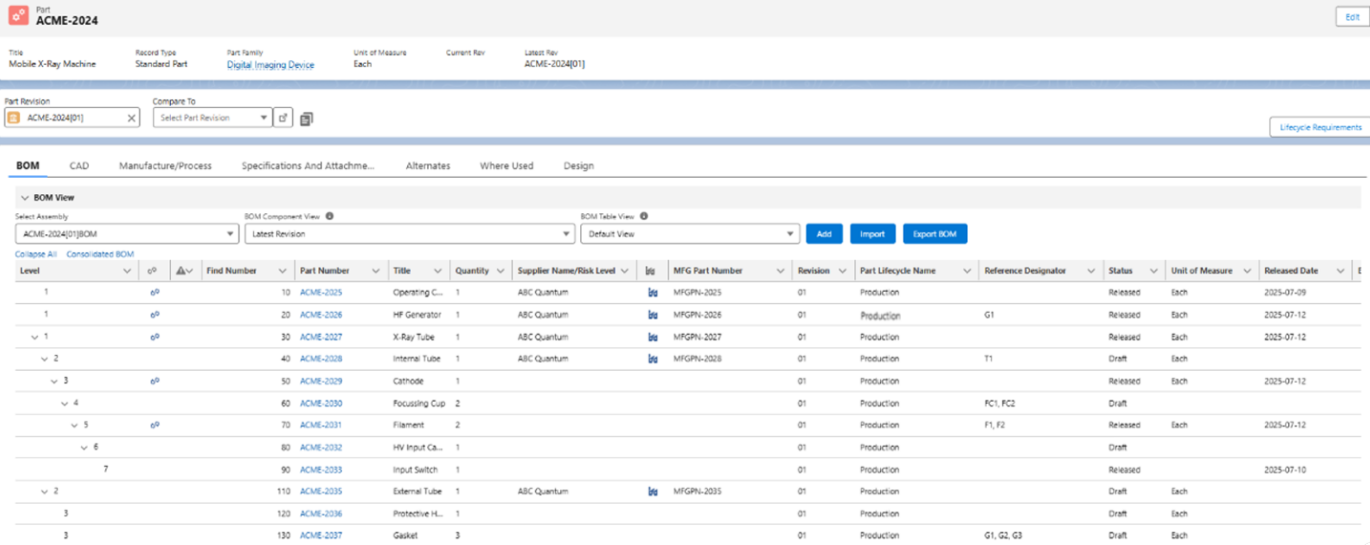
The hierarchical structure of a Multilevel BOM places the Finished Product at the top and then break down the Components that go into that Product.
Prerequisites
Installation Package: CQ Core, CQ PLM Extension
Product: ProductQuest
Function: Parts
User Profile: Standard User
Permissions: CQ Base User PSG and CQ PLM Creator PSG
Steps
-
Open the Level 0 (zero) Part record.
-
Add the Child Parts. The Child Parts are added at Level 1.
-
Open the Level 1 Part record.
-
Add the Child Parts. The Child Parts are added at Level 1.
-
Repeat Step 3 and Step 4 for all the Level 1 Parts those have Child Parts.
-
Open the Level 0 (zero) Part record.
-
Specify Latest Revision in the BOM Component View. This lists all the Level 1 Parts with an Expand arrow (if they have Child Parts).
-
Click Expand All (Note: or you can click Expand arrow).This lists all the Level 1 and Level 2 Parts.
-
Open the Level 2 Part record.
-
Add the Child Parts. The Child Parts are added at Level 1.
-
Repeat Step 6 and Step 7.
-
Click Expand All (Note: or you can click Expand arrow).This lists all the Level 1, Level 2, and Level 3 Parts.
-
Repeat the process for additional Levels.
-
It is compulsory to specify Latest Revision in the BOM Component View.
-
Level of (Final/Finished Product) is considered as the highest Level (i.e. Level 0, not displayed).
-
Lower the numeric value (digit/number) of the Level, the higher is its Level in the assembly order.
Example
Expected Outcome
-
A Multilevel BOM is created.
Additional Resources
ComplianceQuest
-
Adding Parts in BOM
-
Creating Part Subassembly
-
Viewing Levels in BOM
-
Part Qualifications
We Value Your Feedback
To provide feedback or suggestions to improve the help content on this page click here.