
Purpose
The Planned Change/Immediate Change Owner must add the Part Changes to the Planned Change/Immediate Change that will push the part to the next stage in the lifecycle. The Planned Change/Immediate Change Order Owner can add multiple parts at a time thereby allowing faster preparation of large Change Orders with less manual work.
Prerequisites
Installation Package: CQ Core, CQ PLM Extension
Product: ProductQuest
Function: Standard Parts
User Profile: Standard User
Permissions: CQ Base User PSG and CQ PLM Creator PSG and CQ Design Owner PSG
Steps

-
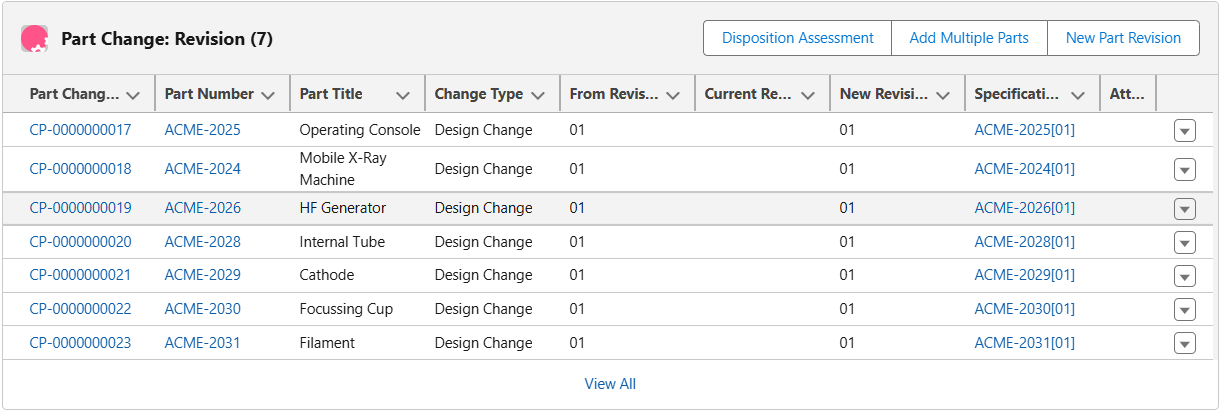
From the Planned Change record, Changes tab, Part Change: Revision section, click the Add Multiple Parts button. (This opens an Add Multiple Parts - Parts List modal window.)
-
Alternatively, from the Immediate Change record, Changes tab, Part Change: Revision section, click the Add Multiple Parts button. (This opens an Add Multiple Parts - Parts List modal window.)
The Part Change functionality included in the Planned Change/Immediate Change Order is displayed only if the CQ PLM extension is installed.
-
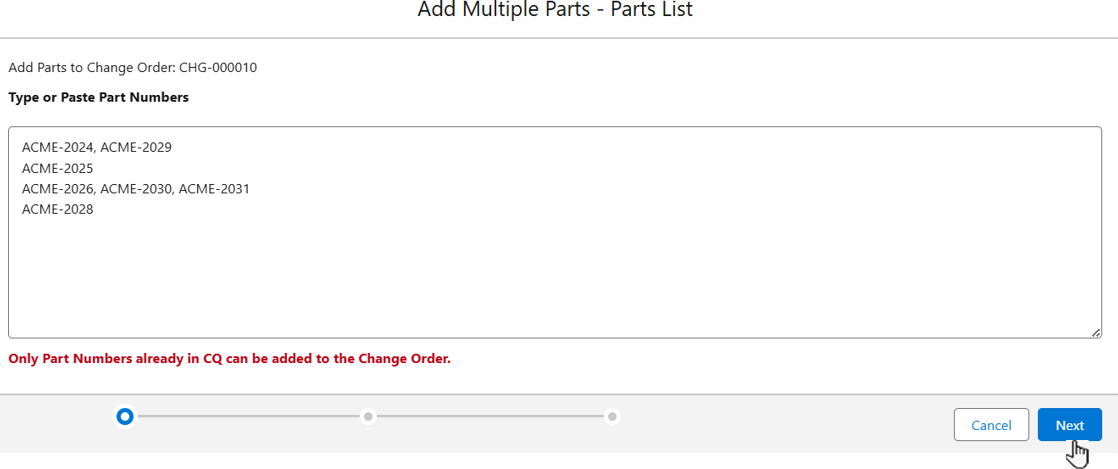
Enter the Part Numbers inside the Type or Paste Part Numbers box. Then, click the Next button (this displays an Add Multiple Parts - Data Verification modal window).
-
Part Numbers can be added vertically (single column list), horizontally (comma separated values), or in any other way.
-
Part Numbers already created in CQ can only be added to the Change Order.
-
The Next button remains disabled until at least one valid entry is entered inside the Type or Paste Part Numbers box.
-
Additionally, at the bottom, a blue color visual step bar with a check mark appears that displays which step of the Add Multiple Parts process is complete.
-
Step 1 corresponds to Add Multiple Parts - Part List (i.e typing of the Part Numbers inside the Type or Paste Part Numbers box).
-
Step 2 corresponds to Add Multiple Parts - Data Verification (i.e verification of the Part Numbers that are added).
-
Step 3 corrsponds to Add Multiple Parts - Completion (i.e completion of the Add Multiple Parts process).
-

-
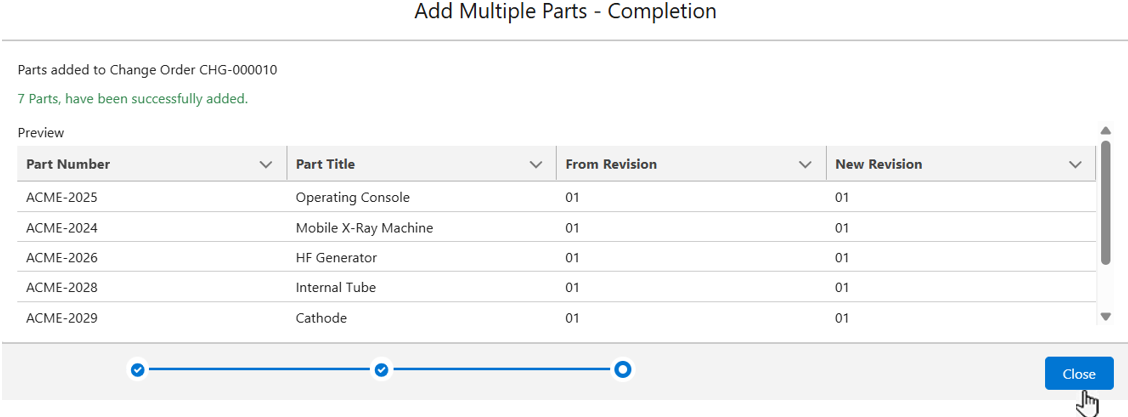
Click the Add button. An Add Multiple Parts - Completion window appears. (This window displays the Part Numbers that are added to the Change Order.)
-
If the step Add Multiple Parts - Data Verification is success, then it displays
-
Verified Parts – N, where N = Count of Verified Parts.
-
Errors – 0 (in Green colour).
-
-
The Add button is enabled.
-
A New Revision corresponds to the exisitng Latest Revision of the Part Number Revision in Draft Status.
-
For all Part Numbers, From Revision defaults to the same value as the New Revision.
-
All Part Numbers for which the Latest Revision does not exists in the Draft Status, the system creates a new Part Number Revision in the Draft Status.
-
All Part Numbers added to Change Order, Changes tab, Part Change: Revision section, by clicking the Add Multiple Parts button are set to Change Type “Design Change” by default.
-
Click the Close button.
-
During the Add Multiple Parts process, if any Part Number is not found, then an Add Multiple Parts - Data Verification window opens. In this window an error message in Red text is displayed.
-
Errors - M (in Red colour), where M = Count of Part Numbers not found.
-
Part not found [ Xa, Xb, Xc, ….] (in Red colour), where [ Xa, Xb, Xc, ...] = Comma separated Part Numbers not found and enclosed within a bracket.
-
-
In such a case, the Add button is disabled.
-
To resolve this error, click the Back button and then add all the Part Numbers in CQ that are not found. During this process all the Part Numbers entered inside the Type or Paste Part Numbers box remains preserved.
-
It aso displays Verified Parts – N, where N = Count of Verified Parts.
-
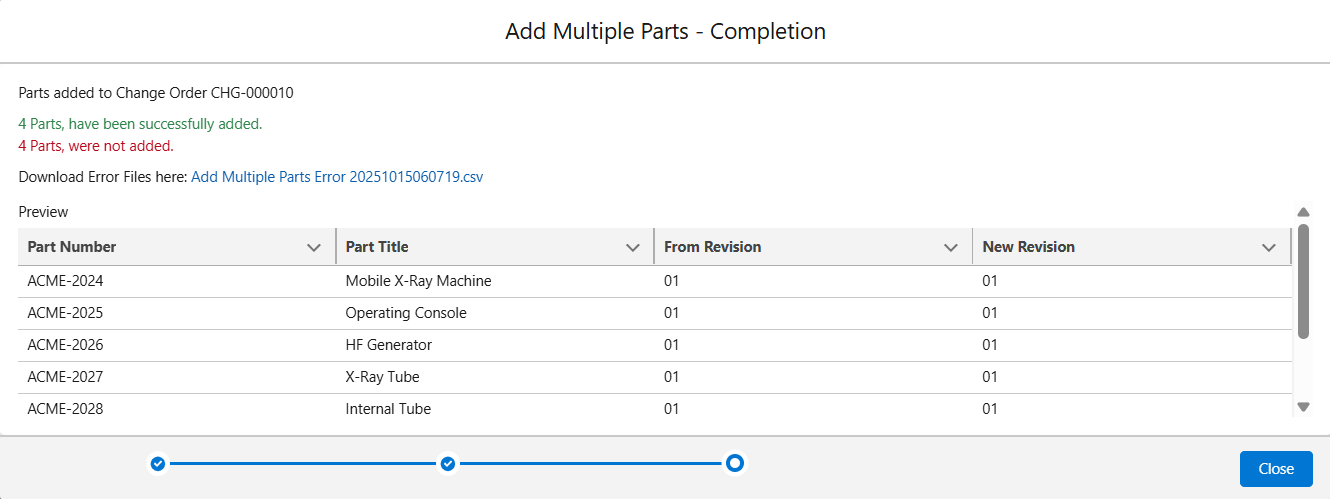
During the Add Multiple Parts process, if a Part Number already added in the Change Order is re-added, then error messages appear in the Add Multiple Parts - Completion modal window. The message includes:
-
Y Parts, have been successfully added, where Y = Count of Part Numbers successfully added (in Green Colour).
-
Z Parts, were not added, where Z = Count of Part Numbers that were not added (in Red Colour).
-
Download Error Files here: Add Multiple Parts Error xxxxxxxxxxxxxx.csv containing the error logs.
-
-
The Add Multiple Parts Error xxxxxxxxxxxxxx.csv file is downloaded to view the errors.
-
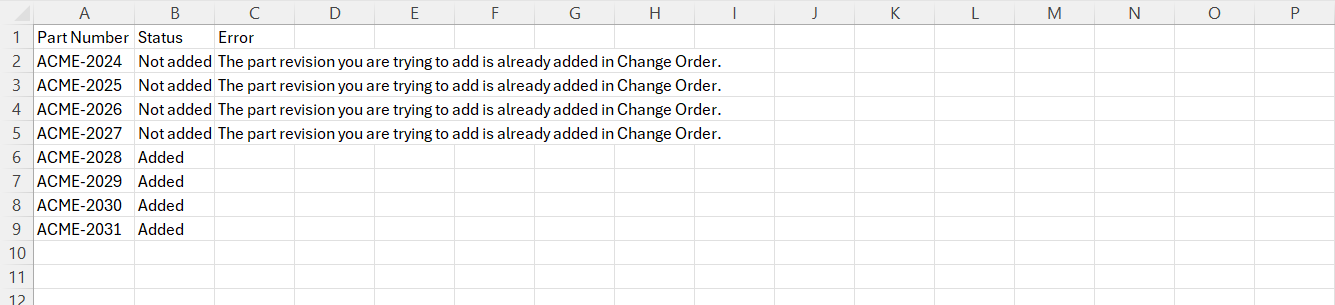
An Add Multiple Parts Error xxxxxxxxxxxxxx.csv file consists of three columns that display the following information:
-
Part Number - It shows all the Part Numbers.
-
Status - It shows “Added“ or “Not Added”.
-
Error - It shows the reason for not adding the Part Numbers.
-
Expected Outcome
-
The Part Changes are added.
Troubleshooting
-
Check back for new articles
Optional Configurations
-
NA
Additional Resources
ComplianceQuest
-
Adding Disposition Assessments
We Value Your Feedback
To provide feedback or suggestions to improve the help content on this page click here.